Options. Interface settings
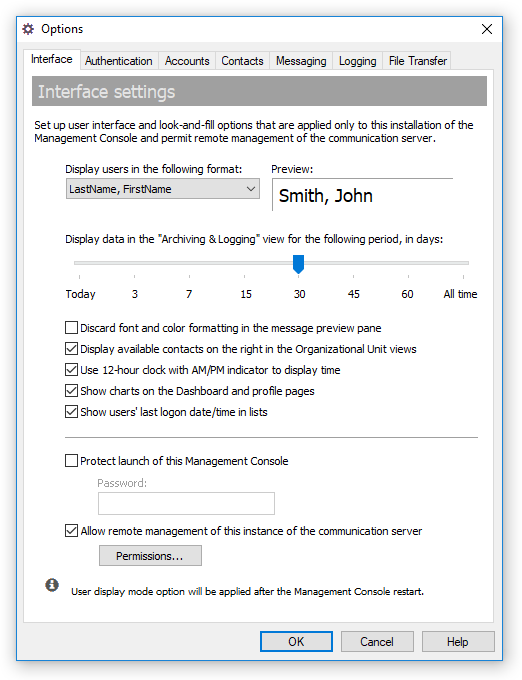
The Interface tab of the Options dialog box contains interface and look-and-feel settings applied to the local installation of the Management Console and also offers to allow remote management of the communication server.
To open the Options dialog box click the  button on the toolbar or select the "Tools\Options..." item from the main menu or use the Ctrl+O hotkey.
 |
| Interface settings |
- "Display users in the following format" — This option allows you to change how users are displayed in the tree (Organizational Units) and result views. This option requires the Management Console to be restarted.
- "Display data in the "Archiving & Logging" view for the following period" — Here you can specify the period (in days) used to display messages and file transfers you can browse in the Archiving & Logging view.
- "Discard font and color formatting in the message preview pane" — Use this option to ignore all font and color formatting when you preview messages in the Archiving & Logging view.
- "Display available contacts on the right in the Organizational Unit views" — This option previews available contacts that are based on Organizational Unit's permission settings. Those contacts are available to all users in the currently selected OU and displayed on the right in the OU view.
- "Use 12-hour clock with AM/PM indicator to display time" — This option shows a time anywere in the local console in US-based format using 12-hour clock by appending AM or PM indicator to the time instead of 24-hour format used by default.
- "Show charts on the Dashboard and profile pages" — This option let display charts that show overall number of connected users, delivered messages, files, etc. for last 7 days.
- "Show users' last logon date/time in lists" — Use this option to display date and time of the recent connection to the server for each user in Organizational Units and also in Find users view. Note that using the option within a huge number of user accounts may result a delay with displaying/refreshing the views.
- "Protect launch of this Management Console" — Enable this checkbox if you want to protect a launch of your local installation of the Management Console too. For example, if your server computer is accessible and shared with another users and you want to restrict them the ability to manage the IM server.
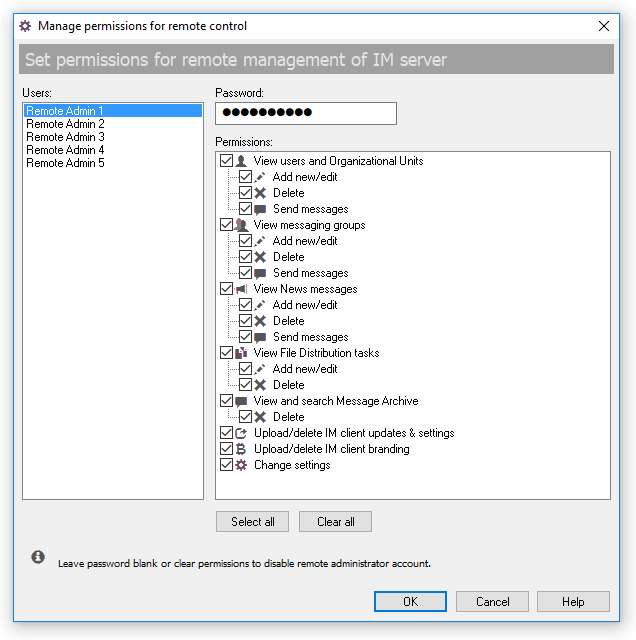
- "Allow remote management of this instance of the communication server" — This option enables management of Bopup Commucation Server from a remotely installed Management Console. If you want to allow remote access to the IM server check this option and then click Permissions... button to set permissions within passwords for built-in remote administrator accounts. Remote adminitrators must enter their secure password from the remote Management Console installed in the Administration Installation Mode.
 |
| Manage permissions for remote control |
This dialog provides 5 built-in administrator accounts that can be used for remote management of the communication server. Select an account, type a secure password and choose permissions to grant the rights for the remote account. In order to disable the selected administrator account clear it's permissions or leave the password blank.
For advanced information on how to manage the communication server remotely see "Install the Management Console only" option in the Setup Wizard described in the Installation tips topic.
 |
Please note, that user display mode option is applied after the console restart. |
 button on the toolbar or select the "Tools\Options..." item from the main menu or use the Ctrl+O hotkey.


